はじめに
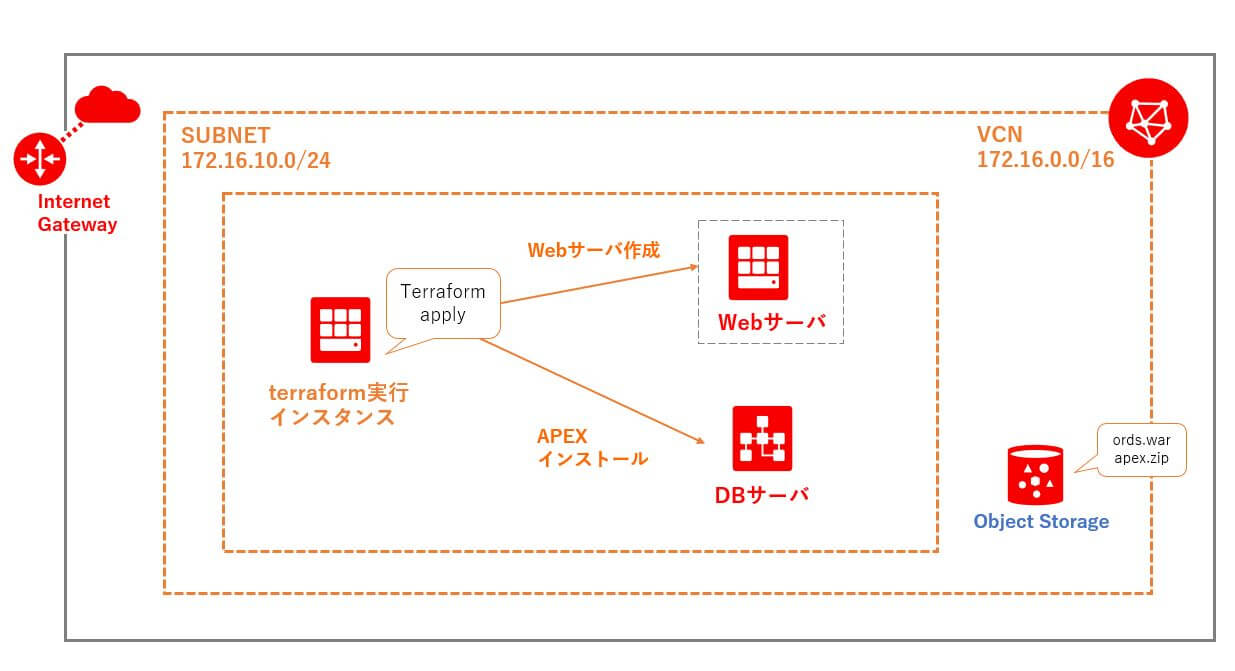
このブログでは
- Computeのインスタンス上にORDSをstandaloneでデプロイします。
- APEXのWEBアクセスはpublic IPアドレスでアクセスします。DNSの設定は行いません。
- Publicのサブネットで構成します。
DBAASはPrivateのネットワークでもインストール可能です。 その際は、Privateのサブネットとセキュリティリストを設定する必要があります。
前提
terraformを実行する際にそれぞれのOCIDが必要になるのでコピーしておきます。

| terraform | 0.11.11 |
| Oracle Database | 18.6.0.0.0 |
| ords | 19.2.0.199.1647 |
| APEX | 19.1 |
1.ネットワークの設定
インストールのため、セキュリティリストにインスタンスを作成するリージョンのIPアドレスレンジのポート22と1521をイングレスルールに追加します。
ここでは東京リージョンを使用しているので、東京リージョンのIPアドレスレンジを3つ追加します。
各リージョンのIPアドレスレンジはここで確認できます。
| No. | 1 | 2 | 3 | 4 | 5 | 6 |
|---|---|---|---|---|---|---|
| ソースタイプ | CIDR | |||||
| ソースCIDR | 132.145.112.0/20 | 140.238.32.0/20 | 140.238.48.0/20 | |||
| IPプロトコル | TCP | |||||
| ソースポート範囲 | すべて | |||||
| 宛先ポート範囲 | 22 | 1521 | 22 | 1521 | 22 | 1521 |
APEXをインストールするため、0.0.0.0/0のエグレスルールを追加します。
| ソースタイプ | CIDR |
|---|---|
| ソースCIDR | 0.0.0.0/0 |
| IPプロトコル | TCP |
| ソースポート範囲 | すべて |
| 宛先ポート範囲 | すべて |
2.Terraformのインストール
terraform実行インスタンスにログインし、Terraformのバージョン管理をするためtfenvをインストールします。
※コマンドの実行はすべて「opc」ユーザで行っています。
gitがインストールされていない場合は、先にyumでgitをインストールします。
$ git --version
-bash: git: command not found
$ sudo yum -y install git
$ git --version
git version 1.8.3.1
$ git clone https://github.com/tfutils/tfenv.git ~/.tfenv
Cloning into '/home/opc/.tfenv'...
remote: Enumerating objects: 13, done.
remote: Counting objects: 100% (13/13), done.
remote: Compressing objects: 100% (12/12), done.
remote: Total 834 (delta 3), reused 7 (delta 1), pack-reused 821
Receiving objects: 100% (834/834), 137.38 KiB | 0 bytes/s, done.
Resolving deltas: 100% (518/518), done.
$ vi ~/.bash_profile
<< ファイルの末尾に、以下を追記します >>
export PATH="$HOME/.tfenv/bin:$PATH"
$ source ~/.bash_profile
terraformをインストールします。
最新は0.12.Xですが、手順書で使われているterraformのファイルが0.11.Xの仕様に基づいて作成されているため、今回は0.11系をインストールします。
$ tfenv install 0.11.11
[INFO] Installing Terraform v0.11.11
[INFO] Downloading release tarball from https://releases.hashicorp.com/terraform/0.11.11/terraform_0.11.11_windows_amd64.zip
######################################################################## 100.0%
[INFO] Downloading SHA hash file from https://releases.hashicorp.com/terraform/0.11.11/terraform_0.11.11_SHA256SUMS
tfenv: tfenv-install: [WARN] No keybase install found, skipping OpenPGP signature verification
Archive: tfenv_download.zetz5m/terraform_0.11.11_windows_amd64.zip
inflating: /c/Users/hoshino/.tfenv/versions/0.11.11/terraform.exe
[INFO] Installation of terraform v0.11.11 successful
[INFO] Switching to v0.11.11
[INFO] Switching completed
$ terraform --version
Terraform v0.11.11
3.Webサーバ用の鍵の作成
※パスフレーズ無しで作成します
$ ssh-keygen -t rsa -b 2048 -C websshkey -f /home/opc/.ssh/id_rsa
$ ls -l /home/opc/.ssh
total 16
-rw-------. 1 opc opc 1675 Oct  2 16:37 id_rsa
-rw-r--r--. 1 opc opc  391 Oct  2 16:37 id_rsa.pub
[box class=”red_box” title=”6.環境変数の設定”]
Enter path to your SSH public key []: /home/opc/.ssh/id_rsa.pub
Enter path to your SSH private key []: /home/opc/.ssh/id_rsa
[/box]
4.APIキーの作成と登録
opensslコマンドで秘密鍵を生成しパーミッションを変更します。次に、秘密鍵から公開鍵を生成します。
$ mkdir .oci
$ openssl genrsa -out ./.oci/oci_api_key.pem 2048
Generating RSA private key, 2048 bit long modulus
..................+++
....................................+++
e is 65537 (0x10001)
$ chmod go-rwx ./.oci/oci_api_key.pem
$ openssl rsa -pubout -in ./.oci/oci_api_key.pem -out ./.oci/oci_api_key_public.pem
writing RSA key
$ ls -l .oci
total 8
-rw-------. 1 opc opc 1675 Oct  4 16:54 oci_api_key.pem
-rw-rw-r--. 1 opc opc  451 Oct  4 16:54 oci_api_key_public.pem
公開鍵を表示しコピーします。
$ cat .oci/oci_api_key_public.pem
アイデンティティ-> ユーザ -> ユーザ名をクリックし、「公開キーの追加」ボタンを押して公開キーを作成します。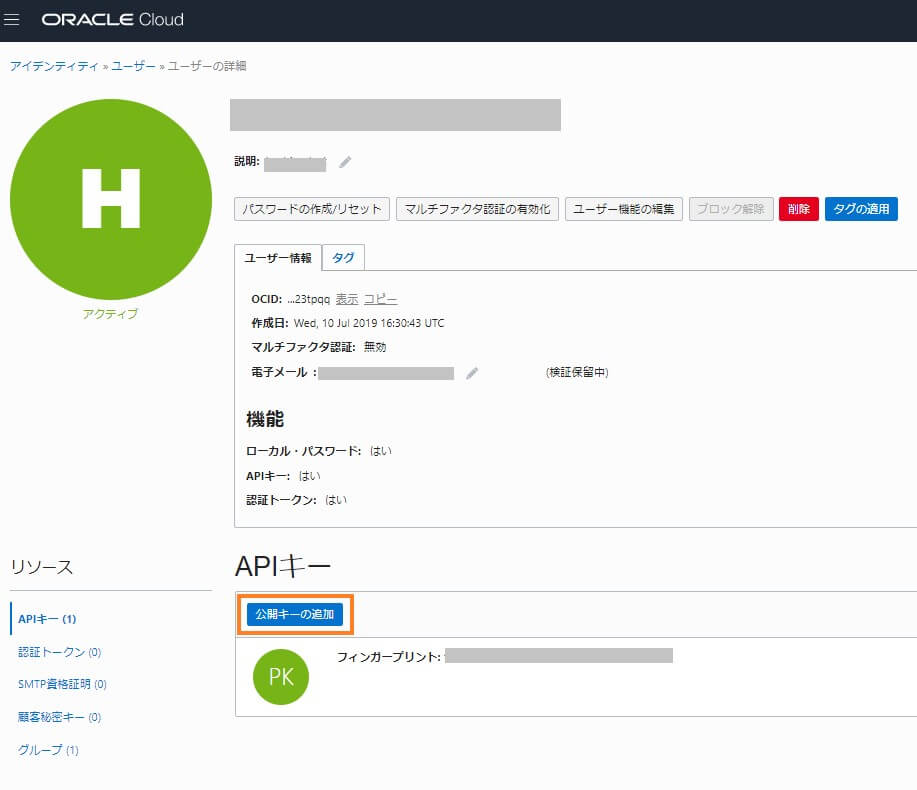

秘密鍵のフルパスを「6.環境変数の設定」で指定します。
公開鍵を追加するとフィンガープリントが表示されるので、コピーしておきます。
Enter path to your SSH public key []: /home/opc/.ssh/id_rsa.pub
Enter path to your SSH private key []: /home/opc/.ssh/id_rsa
5.オブジェクトストレージへのアップロード
Oracle REST Data Services
Oracle APEX
ダウンロードしたords-19.2.0.199.1647.zipは解凍し、ords.warを取り出します。
「コンピュータからファイルを選択」のところに、ダウンロードした「ords.war」と「apex_19.1.zip」ファイルをドロップします。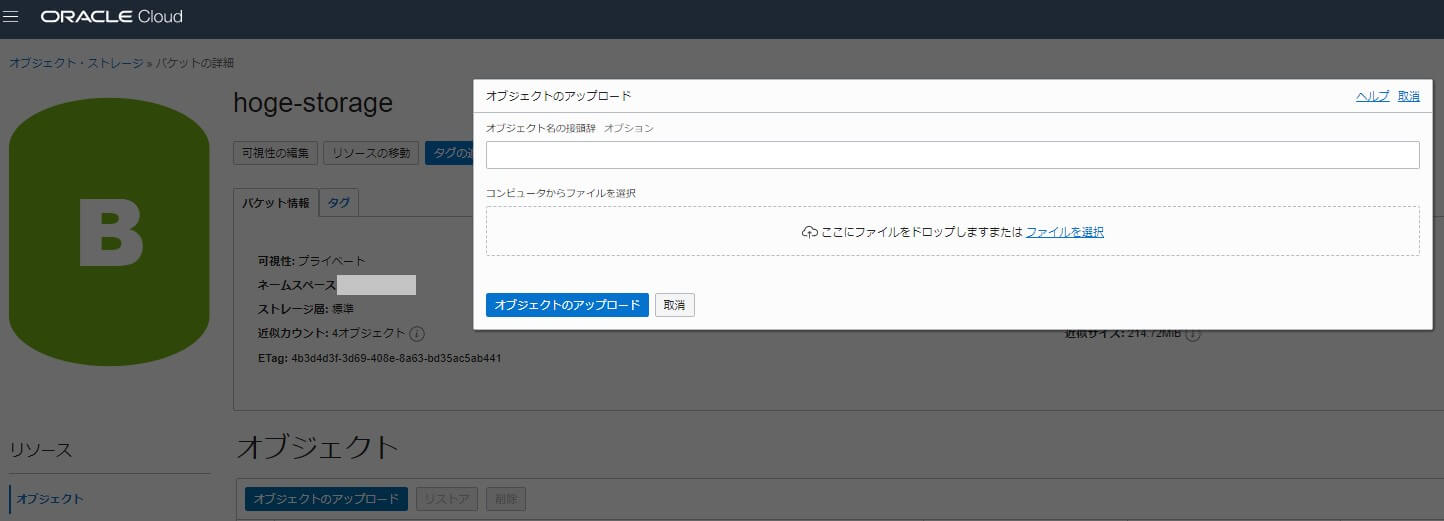
作成したオブジェクトの「アクション」アイコン(3ドット)から、「事前認証リクエストの作成」を実行します。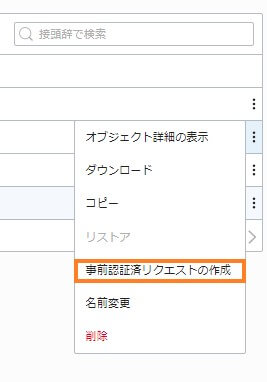
名前と有効期限を設定し、「事前認証リクエストの作成」ボタンをクリックします。
事前認証リクエストのURLは「6.環境変数の設定」で使用するので、どこかにコピーしておきます。
※ウィンドウを閉じてしまうと、再度表示することはできません。
[box class=”red_box” title=”6.環境変数の設定”]
Enter the URL for ORDS.war file []: ords.warの事前認証リクエストのURL
Enter the URL for APEX zip file []: apex_19.1.zipの事前認証リクエストのURL
[/box]
Enter the URL for ORDS.war file []: ords.warの事前認証リクエストのURL
Enter the URL for APEX zip file []: apex_19.1.zipの事前認証リクエストのURL
6.環境変数の設定
ORDS-APEX_Comp.zipを解凍し、中に入っているsetup.shを実行します。対話式になっているので、入力を求められている値をいれていきます。
$ wget https://objectstorage.uk-london-1.oraclecloud.com/p/Syf5wONrf1h6j4GBcFFnWUAEtdFLdNDMWb7j0iPpIjcy838VxLfgNaqg_qcGRaPs/n/intdbaasecra/b/masito-SQLDeveloperWeb/o/ORDS-APEX_Comp.zip
$ unzip ORDS-APEX_Comp.zip
$ cd ORDS-APEX_Comp
$ ./setup.sh
-------------------------------------------------------------------------
Setting up environment variables to launch a compute instance for ORDS.
Please enter required information below:
-------------------------------------------------------------------------
***** Authentication *****
Enter your tenancy's OCID []: ※テナンシのOCIDを入れます。右上のアイコンから調べることができます。
Enter your user's OCID []: ※ユーザのOCIDを入れます。
Enter your fingerprint []: ※「2.APIキーの作成と登録」で登録した鍵のフィンガープリントを入れます。
Enter path to your SSH public key []: /home/opc/.ssh/id_rsa.pub
Enter path to your SSH private key []: /home/opc/.ssh/id_rsa
Enter path to your API private key []: /home/opc/.oci/oci_api_key.pem
Enter your compartment's OCID []: ※コンパートメントのOCIDを入れます。
***** Target Database *****
Enter the database host's IP address []: ※データベースのパブリックIPアドレスを入れます。
Enter the database service name []: ※データベースのサービス名を入れます。サービス名は、「lsnrctl status LISTENER | grep PDB名(小文字)」で調べることができます。
***** Compute Instance *****
Enter the region <us-phoenix-1|us-ashburn-1|eu-frankfurt-1|uk-london-1|ca-toronto-1> []: ap-tokyo-1 ※リージョンを入れます。東京リージョンを使用する場合は、「ap-tokyo-1」を入れます。
Enter the AD <1|2|3> []: 1 ※ADの番号を入れます。
Enter the available Oracle Linux 7.X version <7.6|...> []: 7.6 ※OSのバージョンを入れます。
Enter the subnet's OCID []: ※サブネットのOCIDを入れます。
Enter the Compute Instance's display name []: HOGE-Comp01 ※インスタンスの表示名を入れます。
Enter the Compute Instance's hostname []: hoge-comp01 ※インスタンスのホスト名を入れます。
Enter the Compute Instance's shape <VM.Standard2.1|VM.Standard2.2|...> []: VM.Standard2.1 ※インスタンスのシェイプを入れます。
Enter the Compute Instance's port []: 8888 ※インスタンスのポート番号を入れます。
Enter 0 to run Jetty (ORDS standalone mode), or 1 to run Tomcat []: 0 ※0を入れるとJetty、1を入れるとTomcatが実行されます。
Enter 0 to access with FQDN (hostname.yourdomain), or 1 to access with public IP address []: ※0を入れるとFQDN、1を入れるとパブリックIPアドレスでアクセスできるようになります。
0
***** File location on Object Storage *****
Enter the URL for ORDS.war file []: ※「3.オブジェクトストレージへのアップロード」で作成した事前認証リクエストのURLを入れます。
Enter the URL for APEX zip file []: ※「3.オブジェクトストレージへのアップロード」で作成した事前認証リクエストのURLを入れます。
***** APEX installation mode *****
Enter 0 to install APEX with Full development environment mode, or 1 to install APEX with Runtime environment mode []: 0
INFO: Updating values...
INFO: env-vars is updated successfully.
Pleaes set environment variables. (ex. source env-vars)env-varsファイルが作成されます。
7.Terraformの実行
terraform init
ワークスペースの初期化を行います。provider ociのダウンロードなどが行われます。
$ source env-vars
$ terraform init

Initializing provider plugins...
- Checking for available provider plugins on https://releases.hashicorp.com...
- Downloading plugin for provider "null" (2.1.2)...
- Downloading plugin for provider "oci" (3.39.0)...

The following providers do not have any version constraints in configuration,
so the latest version was installed.

To prevent automatic upgrades to new major versions that may contain breaking
changes, it is recommended to add version = "..." constraints to the
corresponding provider blocks in configuration, with the constraint strings
suggested below.

* provider.null: version = "~> 2.1"
* provider.oci: version = "~> 3.39"

Terraform has been successfully initialized!

You may now begin working with Terraform. Try running "terraform plan" to see
any changes that are required for your infrastructure. All Terraform commands
should now work.

If you ever set or change modules or backend configuration for Terraform,
rerun this command to reinitialize your working directory. If you forget, other
commands will detect it and remind you to do so if necessary.
terraform plan
設定ファイルのチェックを行います。
$ terraform plan
var.target_db_admin_pw
  Enter a value: DBAASのDBのsysのパスワードを入力する

Refreshing Terraform state in-memory prior to plan...
The refreshed state will be used to calculate this plan, but will not be
persisted to local or remote state storage.

data.oci_identity_availability_domains.ADs: Refreshing state...
data.oci_core_images.OLImageOCID: Refreshing state...

------------------------------------------------------------------------

An execution plan has been generated and is shown below.
Resource actions are indicated with the following symbols:
  + create
 <= read (data resources)

Terraform will perform the following actions:

 <= data.oci_core_vnic.InstanceVnic
      id:
      availability_domain:
      compartment_id:
      defined_tags.%:
      display_name:
      freeform_tags.%:
      hostname_label:
      is_primary:
      mac_address:
      nsg_ids.#:
      private_ip_address:
      public_ip_address:
      skip_source_dest_check:
      state:
      subnet_id:
      time_created:
      vnic_id:                                  "${lookup(data.oci_core_vnic_attachments.InstanceVnics.vnic_attachments[0],\"vnic_id\")}"

 <= data.oci_core_vnic_attachments.InstanceVnics
      id:
      availability_domain:                      "pIvr:AP-TOKYO-1-AD-1"
      compartment_id:                           "ocid1.compartment.oc1.."
      instance_id:                              "${oci_core_instance.ORDS-Comp-Instance.id}"
      vnic_attachments.#:

  + null_resource.remote-exec_init
      id:

  + null_resource.remote-exec_tomcat-1
      id:

  + null_resource.remote-exec_tomcat-2
      id:

  + null_resource.remote-exec_tomcat-apex
      id:

  + oci_core_instance.ORDS-Comp-Instance
      id:
      agent_config.#:
      availability_domain:                      "pIvr:AP-TOKYO-1-AD-1"
      boot_volume_id:
      compartment_id:                           "ocid1.compartment.oc1.."
      create_vnic_details.#:
      dedicated_vm_host_id:
      display_name:                             "HOGE-Comp01"
      freeform_tags.%:
      hostname_label:                           "hoge-comp01"
      image:
      ipxe_script:
      is_pv_encryption_in_transit_enabled:
      launch_mode:
      launch_options.#:
      metadata.%:                               "2"
      metadata.ssh_authorized_keys:             "ssh-rsa AAAAB3NzaC1yc2EAAAADAQABAAABAQC..........xxxxxxxxxxxxxxxxxxxxxxxxxxxxxxxxxxxxxxxxxxxxxxxxxxxxxxxxxxxxxxxxxxxxxxxxxxxxxxxxx"
      metadata.user_data:                       "+xxxxxxxxxxxxxxxxxxxxxxxxxx="
      private_ip:
      public_ip:
      region:
      shape:                                    "VM.Standard2.1"
      source_details.#:                         "1"
      source_details.0.boot_volume_size_in_gbs:
      source_details.0.kms_key_id:
      source_details.0.source_id:               "ocid1.image.oc1.ap-tokyo-1."
      source_details.0.source_type:             "image"
      subnet_id:                                "ocid1.subnet.oc1.ap-tokyo-1."
      time_created:
      time_maintenance_reboot_due:


Plan: 5 to add, 0 to change, 0 to destroy.

------------------------------------------------------------------------

Note: You didn't specify an "-out" parameter to save this plan, so Terraform
can't guarantee that exactly these actions will be performed if
"terraform apply" is subsequently run.
terraform apply
リソースを作成します。
$ terraform apply
var.target_db_admin_pw
  Enter a value: DBAASのDBのsysのパスワードを入力する

data.oci_identity_availability_domains.ADs: Refreshing state...
data.oci_core_images.OLImageOCID: Refreshing state...

An execution plan has been generated and is shown below.
Resource actions are indicated with the following symbols:
  + create
 <= read (data resources)

Terraform will perform the following actions:

 <= data.oci_core_vnic.InstanceVnic
      id:
      availability_domain:
      compartment_id:
      defined_tags.%:
      display_name:
      freeform_tags.%:
      hostname_label:
      is_primary:
      mac_address:
      nsg_ids.#:
      private_ip_address:
      public_ip_address:
      skip_source_dest_check:
      state:
      subnet_id:
      time_created:
      vnic_id:                                  "${lookup(data.oci_core_vnic_attachments.InstanceVnics.vnic_attachments[0],\"vnic_id\")}"

 <= data.oci_core_vnic_attachments.InstanceVnics
      id:
      availability_domain:                      "pIvr:AP-TOKYO-1-AD-1"
      compartment_id:                           "ocid1.compartment.oc1.."
      instance_id:                              "${oci_core_instance.ORDS-Comp-Instance.id}"
      vnic_attachments.#:

  + null_resource.remote-exec_init
      id:

  + null_resource.remote-exec_tomcat-1
      id:

  + null_resource.remote-exec_tomcat-2
      id:

  + null_resource.remote-exec_tomcat-apex
      id:

  + oci_core_instance.ORDS-Comp-Instance
      id:
      agent_config.#:
      availability_domain:                      "pIvr:AP-TOKYO-1-AD-1"
      boot_volume_id:
      compartment_id:                           "ocid1.compartment.oc1.."
      create_vnic_details.#:
      dedicated_vm_host_id:
      display_name:                             "HOGE-Comp01"
      freeform_tags.%:
      hostname_label:                           "hoge-comp01"
      image:
      ipxe_script:
      is_pv_encryption_in_transit_enabled:
      launch_mode:
      launch_options.#:
      metadata.%:                               "2"
      metadata.ssh_authorized_keys:             "ssh-rsa AAAAB3NzaC1yc2EAAAADAQABAAABAQC0IbhO/.........................+/+wtgH"
      metadata.user_data:                       "+IC9ob21lL29wYy9sYXVuY2gudHh0Cgo="
      private_ip:
      public_ip:
      region:
      shape:                                    "VM.Standard2.1"
      source_details.#:                         "1"
      source_details.0.boot_volume_size_in_gbs:
      source_details.0.kms_key_id:
      source_details.0.source_id:               "ocid1.image.oc1.ap-tokyo-1."
      source_details.0.source_type:             "image"
      subnet_id:                                "ocid1.subnet.oc1.ap-tokyo-1."
      time_created:
      time_maintenance_reboot_due:


Plan: 5 to add, 0 to change, 0 to destroy.

Do you want to perform these actions?
  Terraform will perform the actions described above.
  Only 'yes' will be accepted to approve.

  Enter a value: yes

oci_core_instance.ORDS-Comp-Instance: Creating...
  agent_config.#:                           "" => ""
  availability_domain:                      "" => "pIvr:AP-TOKYO-1-AD-1"
  boot_volume_id:                           "" => ""
  compartment_id:                           "" => "ocid1.compartment.oc1.."
  create_vnic_details.#:                    "" => ""
  dedicated_vm_host_id:                     "" => ""
  display_name:                             "" => "HOGE-Comp01"
  freeform_tags.%:                          "" => ""
  hostname_label:                           "" => "hoge-comp01"
  image:                                    "" => ""
  ipxe_script:                              "" => ""
  is_pv_encryption_in_transit_enabled:      "" => ""
  launch_mode:                              "" => ""
  launch_options.#:                         "" => ""
  metadata.%:                               "" => "2"
  metadata.ssh_authorized_keys:             "" => "ssh-rsa AAAAB3NzaC1yc2EAAAADAQABAAABAQC0IbhO/.......xxxxxxxxxxxxxxxxxxxxxxxxxxxxxxxxx"
  metadata.user_data:                       "" => "+xxxxxxxxxxxxxxxxxxxxxxxxxxxxxx="
  private_ip:                               "" => ""
  public_ip:                                "" => ""
  region:                                   "" => ""
  shape:                                    "" => "VM.Standard2.1"
  source_details.#:                         "" => "1"
  source_details.0.boot_volume_size_in_gbs: "" => ""
  source_details.0.kms_key_id:              "" => ""
  source_details.0.source_id:               "" => "ocid1.image.oc1.ap-tokyo-1."
  source_details.0.source_type:             "" => "image"
  subnet_id:                                "" => "ocid1.subnet.oc1.ap-tokyo-1."
  time_created:                             "" => ""
  time_maintenance_reboot_due:              "" => ""
oci_core_instance.ORDS-Comp-Instance: Still creating... (10s elapsed)
oci_core_instance.ORDS-Comp-Instance: Still creating... (20s elapsed)
oci_core_instance.ORDS-Comp-Instance: Still creating... (30s elapsed)
oci_core_instance.ORDS-Comp-Instance: Still creating... (40s elapsed)
oci_core_instance.ORDS-Comp-Instance: Still creating... (50s elapsed)
oci_core_instance.ORDS-Comp-Instance: Still creating... (1m0s elapsed)
oci_core_instance.ORDS-Comp-Instance: Still creating... (1m10s elapsed)
oci_core_instance.ORDS-Comp-Instance: Creation complete after 1m14s (ID: ocid1.instance.oc1.ap-tokyo-1.abxhiljr4...)
data.oci_core_vnic_attachments.InstanceVnics: Refreshing state...
data.oci_core_vnic.InstanceVnic: Refreshing state...
null_resource.remote-exec_init: Creating...
null_resource.remote-exec_init: Provisioning with 'file'...
null_resource.remote-exec_init: Still creating... (10s elapsed)
null_resource.remote-exec_init: Provisioning with 'remote-exec'...
null_resource.remote-exec_init (remote-exec): Connecting to remote host via SSH...
null_resource.remote-exec_init (remote-exec):   Host: xxx.xxx.xxx.xxx
null_resource.remote-exec_init (remote-exec):   User: opc
null_resource.remote-exec_init (remote-exec):   Password: false
null_resource.remote-exec_init (remote-exec):   Private key: true
null_resource.remote-exec_init (remote-exec):   SSH Agent: false
null_resource.remote-exec_init (remote-exec):   Checking Host Key: false
null_resource.remote-exec_init (remote-exec): Connected!
null_resource.remote-exec_init (remote-exec): Archive:  files_init.zip
null_resource.remote-exec_init (remote-exec):   inflating: config_init.sh
null_resource.remote-exec_init (remote-exec): Loaded plugins: langpacks, ulninfo
null_resource.remote-exec_init (remote-exec): Existing lock /var/run/yum.pid: another copy is running as pid 2707.
null_resource.remote-exec_init (remote-exec): Another app is currently holding the yum lock; waiting for it to exit...
null_resource.remote-exec_init (remote-exec):   The other application is: yum
null_resource.remote-exec_init (remote-exec):     Memory :  89 M RSS (415 MB VSZ)
null_resource.remote-exec_init (remote-exec):     Started: Fri Aug 30 15:11:12 2019 - 00:06 ago
null_resource.remote-exec_init (remote-exec):     State  : Running, pid: 2707
null_resource.remote-exec_init (remote-exec): Another app is currently holding the yum lock; waiting for it to exit...
null_resource.remote-exec_init (remote-exec):   The other application is: yum
null_resource.remote-exec_init (remote-exec):     Memory :  72 M RSS (471 MB VSZ)
null_resource.remote-exec_init (remote-exec):     Started: Fri Aug 30 15:11:12 2019 - 00:08 ago
null_resource.remote-exec_init (remote-exec):     State  : Sleeping, pid: 2707
null_resource.remote-exec_init: Still creating... (20s elapsed)
null_resource.remote-exec_init: Still creating... (30s elapsed)
null_resource.remote-exec_init (remote-exec): ksplice-uptrack: [               ] 1/16
null_resource.remote-exec_init (remote-exec): ksplice-uptrack: [#              ] 2/16
null_resource.remote-exec_init (remote-exec): ksplice-uptrack: [##             ] 3/16
null_resource.remote-exec_init (remote-exec): ksplice-uptrack: [###            ] 4/16
null_resource.remote-exec_init (remote-exec): ksplice-uptrack: [####           ] 5/16
null_resource.remote-exec_init (remote-exec): ksplice-uptrack: [#####          ] 6/16
null_resource.remote-exec_init (remote-exec): ksplice-uptrack: [######         ] 7/16
null_resource.remote-exec_init (remote-exec): ksplice-uptrack: [#######        ] 8/16
null_resource.remote-exec_init (remote-exec): ksplice-uptrack: [########       ] 9/16
null_resource.remote-exec_init (remote-exec): ksplice-uptrac: [#########      ] 10/16
null_resource.remote-exec_init (remote-exec): ksplice-uptrac: [##########     ] 11/16
null_resource.remote-exec_init (remote-exec): ksplice-uptrac: [###########    ] 12/16
null_resource.remote-exec_init (remote-exec): ksplice-uptrac: [############   ] 13/16
null_resource.remote-exec_init (remote-exec): ksplice-uptrac: [#############  ] 14/16
null_resource.remote-exec_init (remote-exec): ksplice-uptrac: [############## ] 15/16
null_resource.remote-exec_init (remote-exec): ksplice-uptrack                   16/16
null_resource.remote-exec_init (remote-exec): Resolving Dependencies
null_resource.remote-exec_init (remote-exec): --> Running transaction check
null_resource.remote-exec_init (remote-exec): ---> Package java-1.8.0-openjdk.x86_64 1:1.8.0.222.b10-0.el7_6 will be installed

~省略~

null_resource.remote-exec_tomcat-apex: Creation complete after 13m59s (ID: 2271443729911913119)

Apply complete! Resources: 5 added, 0 changed, 0 destroyed.

Outputs:

InstancePrivateIP = [
    172.16.10.8
]
InstancePublicIP = [
    <HOGE-Comp01のPublic IPアドレス>
]
URL : APEX (PublicIP) = [
    https://<HOGE-Comp01のPublic IPアドレス>:8888/ords/pdb01/
]
8.APEXにログイン
次に、APEXにログインするためイングレスルールに自分の環境のグローバルIPアドレスとポート8888を追加します。
グローバルIPアドレスは確認くんなどで調べることができます。
terraform applyを実行後に表示されるURLにアクセスします。
https://<IPアドレス>:8888/ords/pdb01/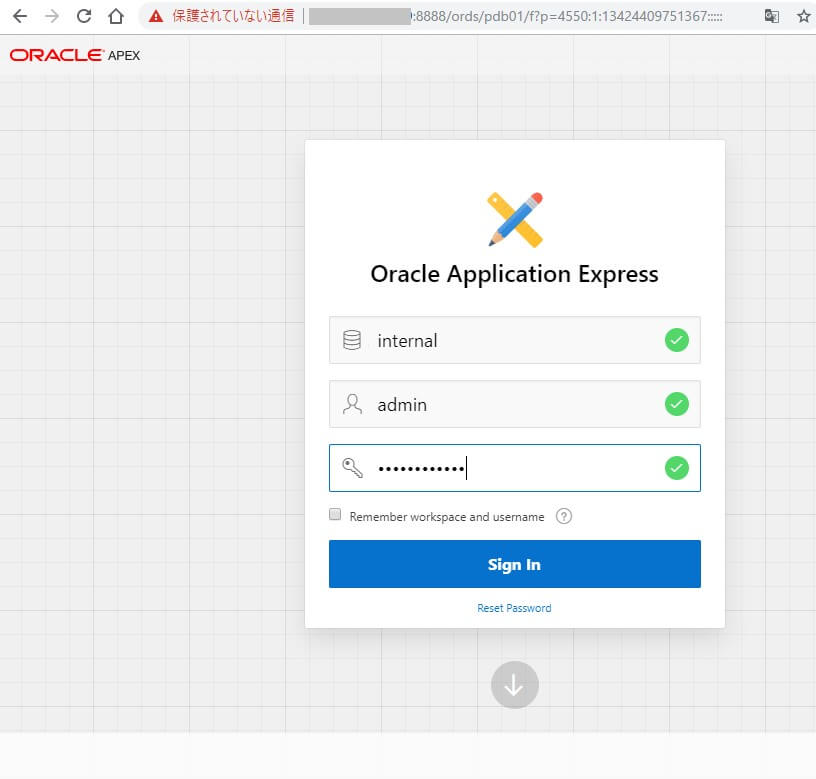
Workspace
「internal」を入れます。
Username
「admin」を入れます。
Password
DBのパスワードを入れます。
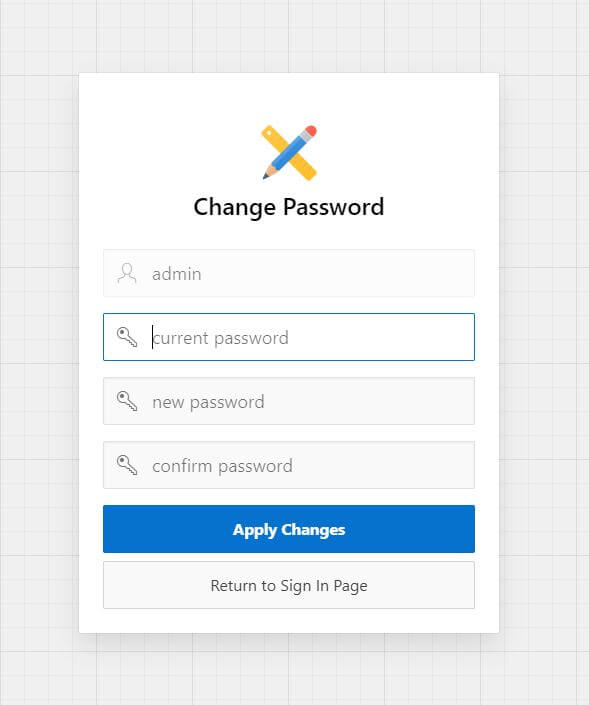
パスワード変更画面に遷移します。
パスワードを変更すると、APEXにログインすることができます。
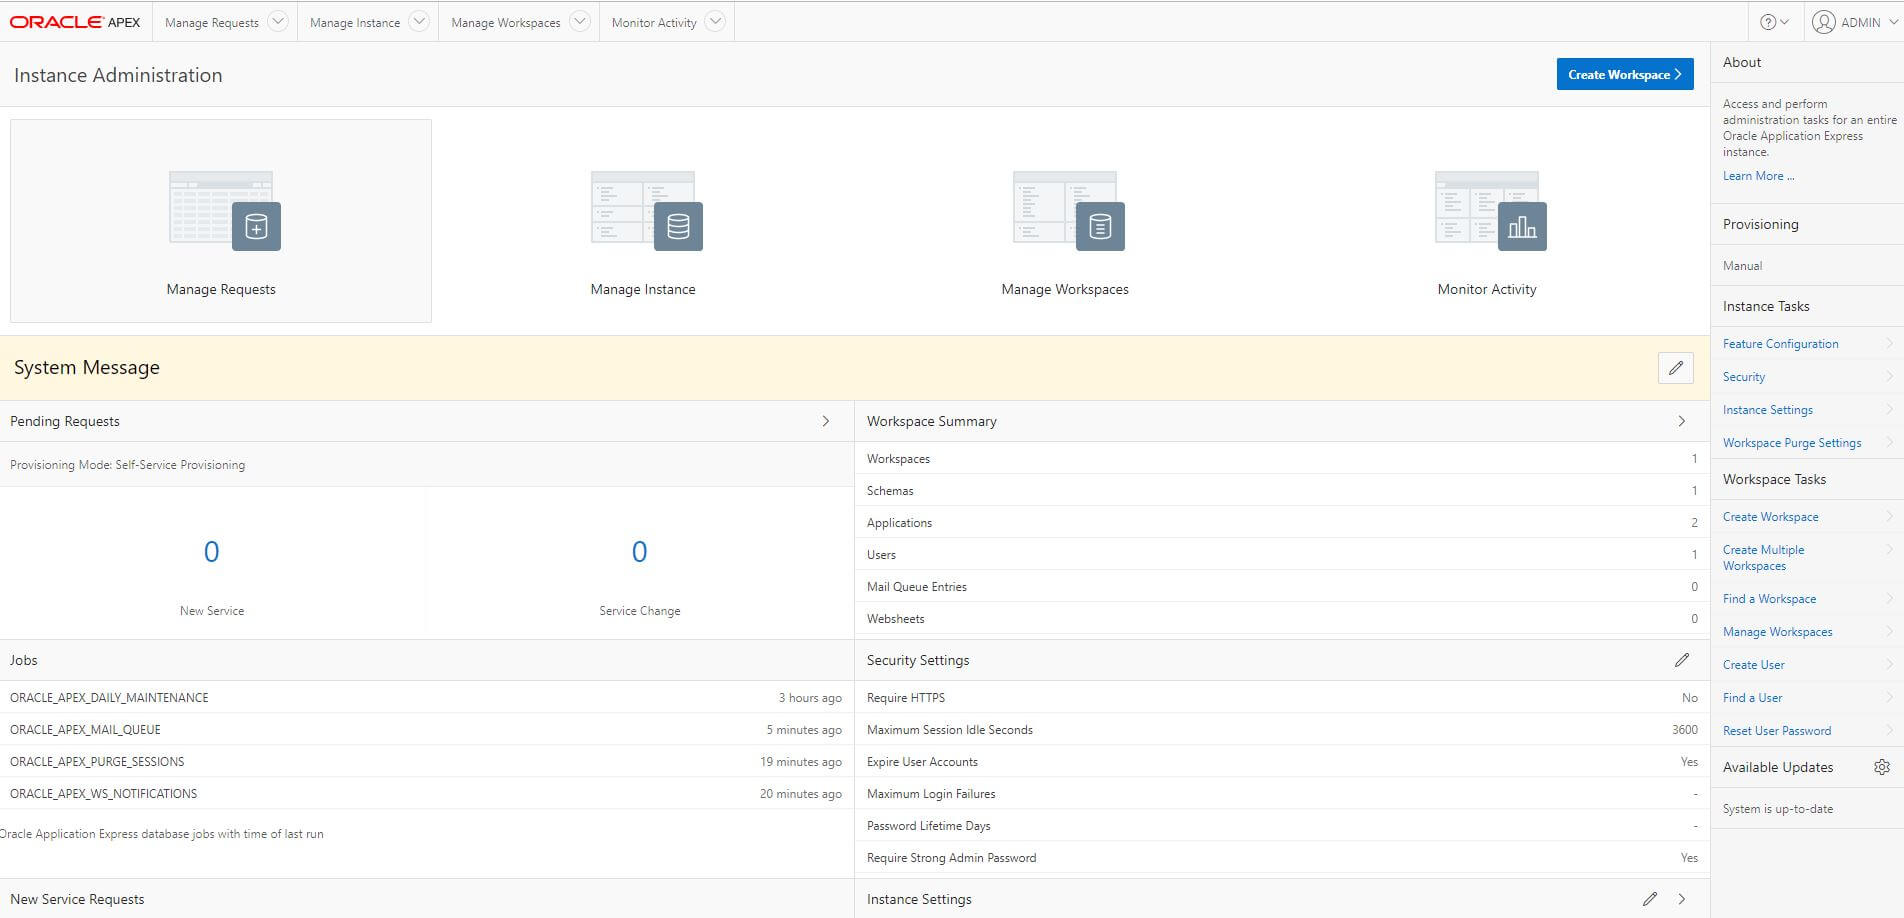
9.再実行する場合
ordsが動いているWEBサーバをターミネイトします。
次に、DBサーバにインストールしたAPEXを削除するため、apex.zipをダウンロードし解凍します。
$ sudo su - oracle
$ wget 「3.オブジェクトストレージへのアップロード」で作成した事前認証リクエストのURL
$ unzip apex_19.1.zip
$ cd apex
セッションが残っているとAPEX関連のスキーマが削除されないので、PDBを再起動します。
$ sqlplus / as sysdba
SQL> alter session set container=PDB01;
SQL> shutdown immediate
SQL> startup
APEXを削除します。
SQL> @apxremov.sql既存のORDS-APEX_Compのディレクトリを削除するかリネームし、ORDS-APEX_Comp.zipを解凍してsetupをやり直します。


